

Check-In & Check-Out
Checking children in and out is the core of daily attendance tracking. You can check in individual children, multiple children at once, or mark children as absent.
Checking In a Child
Click the Check-In button
On the Attendance page, find the child in the list and click their Check-In button.
Review the check-in details
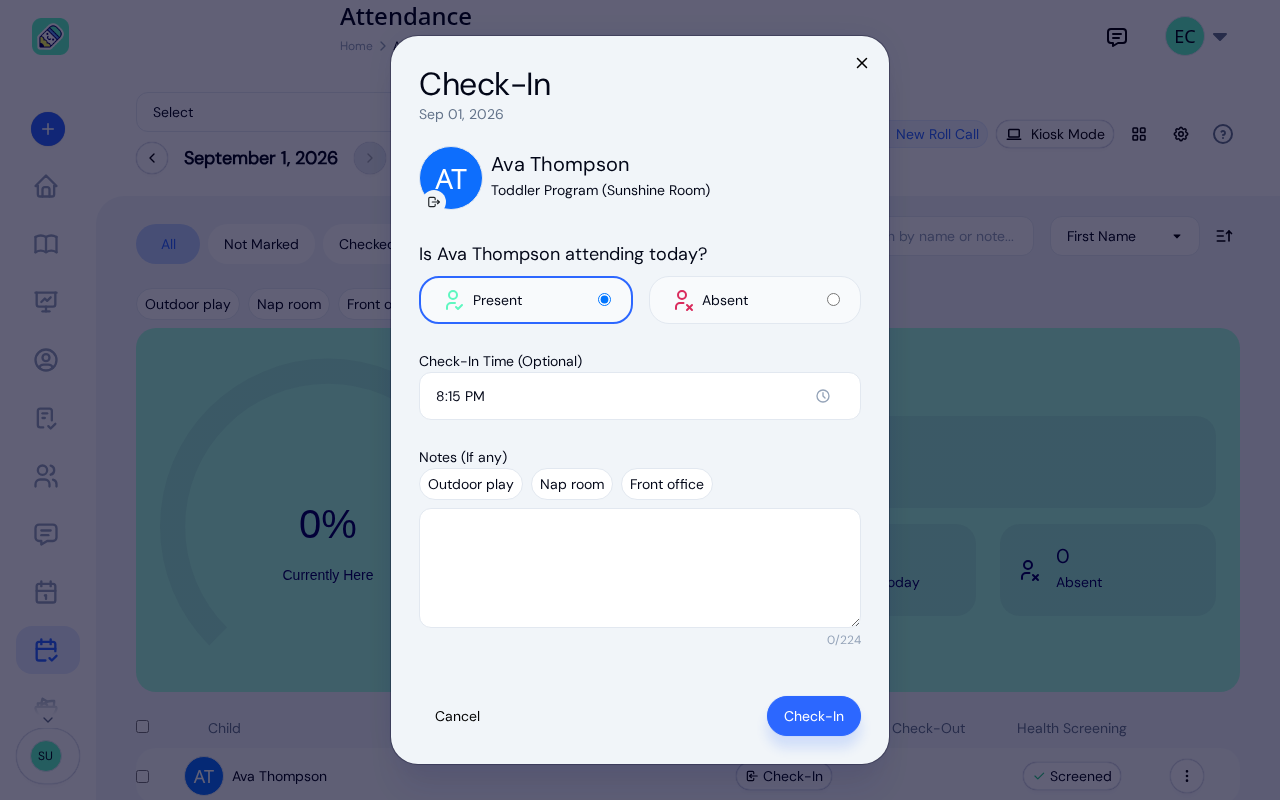
The check-in modal shows the child's name, program, and classroom. You'll see:
- Present / Absent toggle — select whether the child is attending or absent
- Check-In Time — defaults to the current time, but you can adjust it
- Notes — click a predefined note pill (like "Late Arrival" or "Bus Pickup") or type a custom note
Click Check-In
Click the Check-In button to confirm. The child's status updates immediately and the attendance metrics refresh.
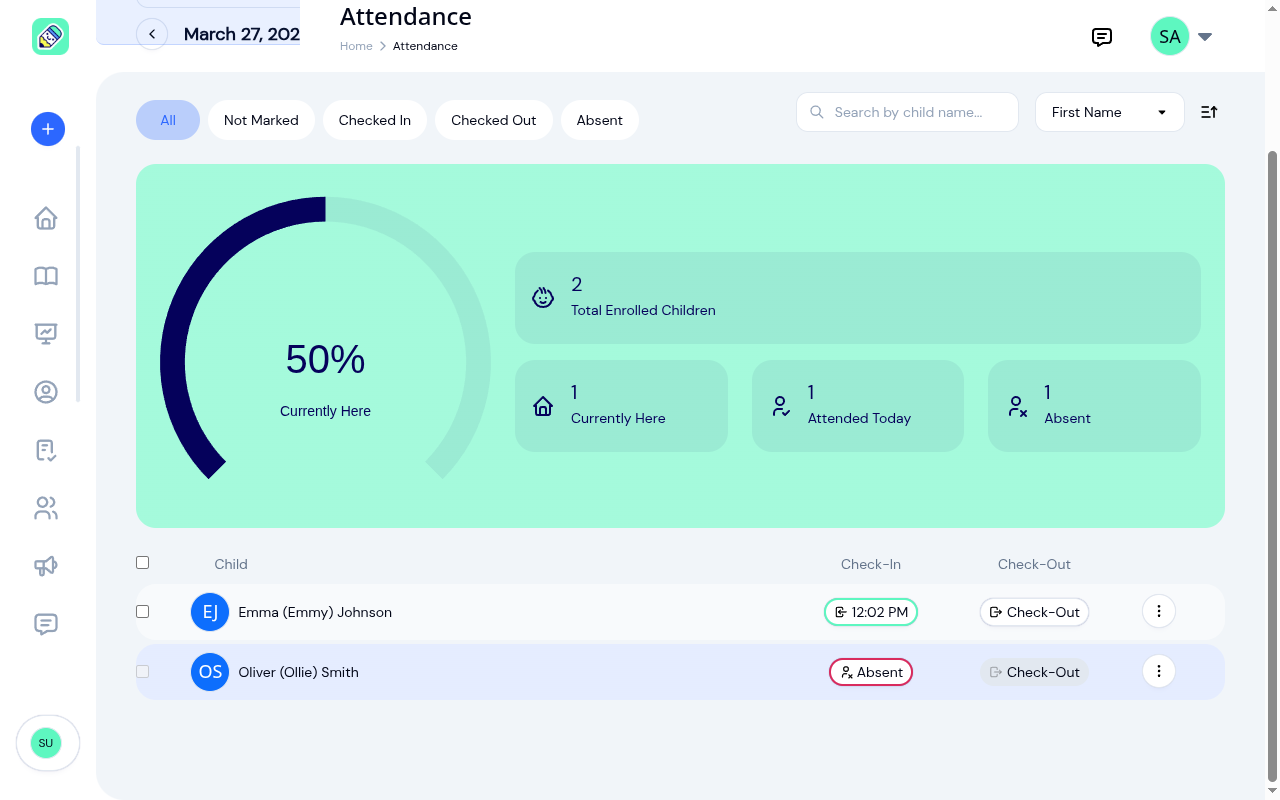
After check-in, the child's row shows their check-in time instead of the Check-In button.
Checking Out a Child
Click the Check-Out button
Find the checked-in child and click their Check-Out button.
Set the check-out time
The check-out modal shows the child's name and lets you:
- Set the Check-Out Time (defaults to now)
- Add optional Notes
The check-out time can be the same as the check-in time. That matters when you check a child in by mistake and want to undo it: check them straight back out and the record closes, even though both stamps read the same minute. Only a check-out that is genuinely earlier than the check-in is refused.
Click Check-Out
Click Check-Out to confirm. The child's row now shows both their check-in and check-out times.
Marking a Child as Absent
When checking in a child, select Absent instead of Present in the check-in modal. The child will be marked as absent for the day, and the Absent count in the metrics widget will increase.
You can also mark multiple children absent at once using bulk actions (see below).
Health Screening at Check-In
When your center turns on health screening, each child gets a Health Screen button in the attendance list. A child has to pass the day's screening before they can be checked in.
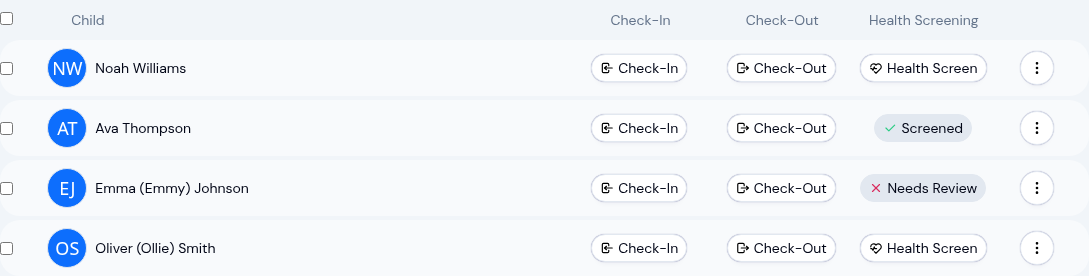
The button tells you where each child stands for the day:
- Health Screen — not screened yet. Click it to run the screening.
- Screened — passed today's screening. The child can be checked in. Click it again to look back at the answers.
- Needs Review — did not pass today's screening. The child cannot be checked in until this is resolved. Click it to re-do the screening.
Every button here stays clickable through the day. The only exception is a child marked absent, whose Health Screen button is greyed out since there's nothing to screen.
Running a screening
Click Health Screen to open the questionnaire, answer each yes/no question about the child's health today, add an optional note, and select Submit. (You have to answer every question before you can submit.)
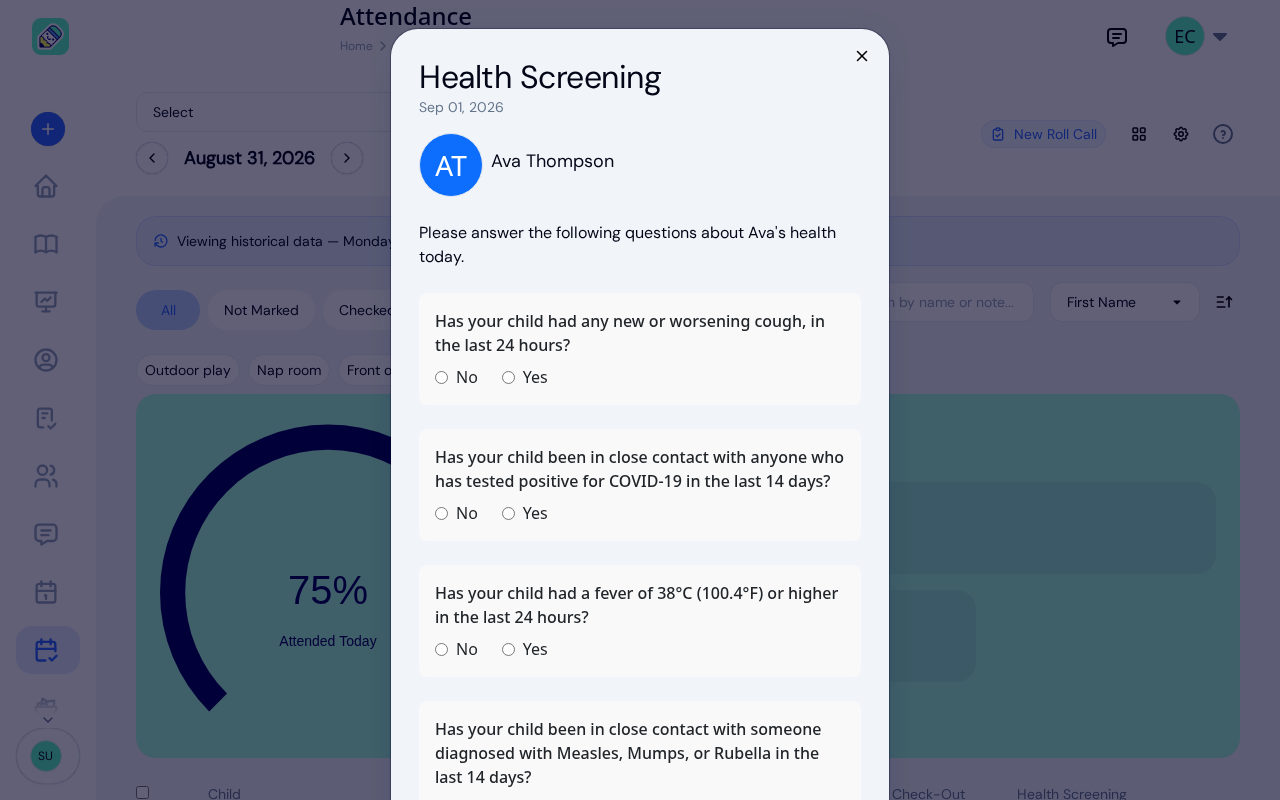
If every answer is clear, the child passes and their button switches to Screened.
If any answer flags a concern, the child does not pass. KidzLog shows a "Did not pass today's screening" message with the option to Re-answer or Close, and the child's button switches to Needs Review.
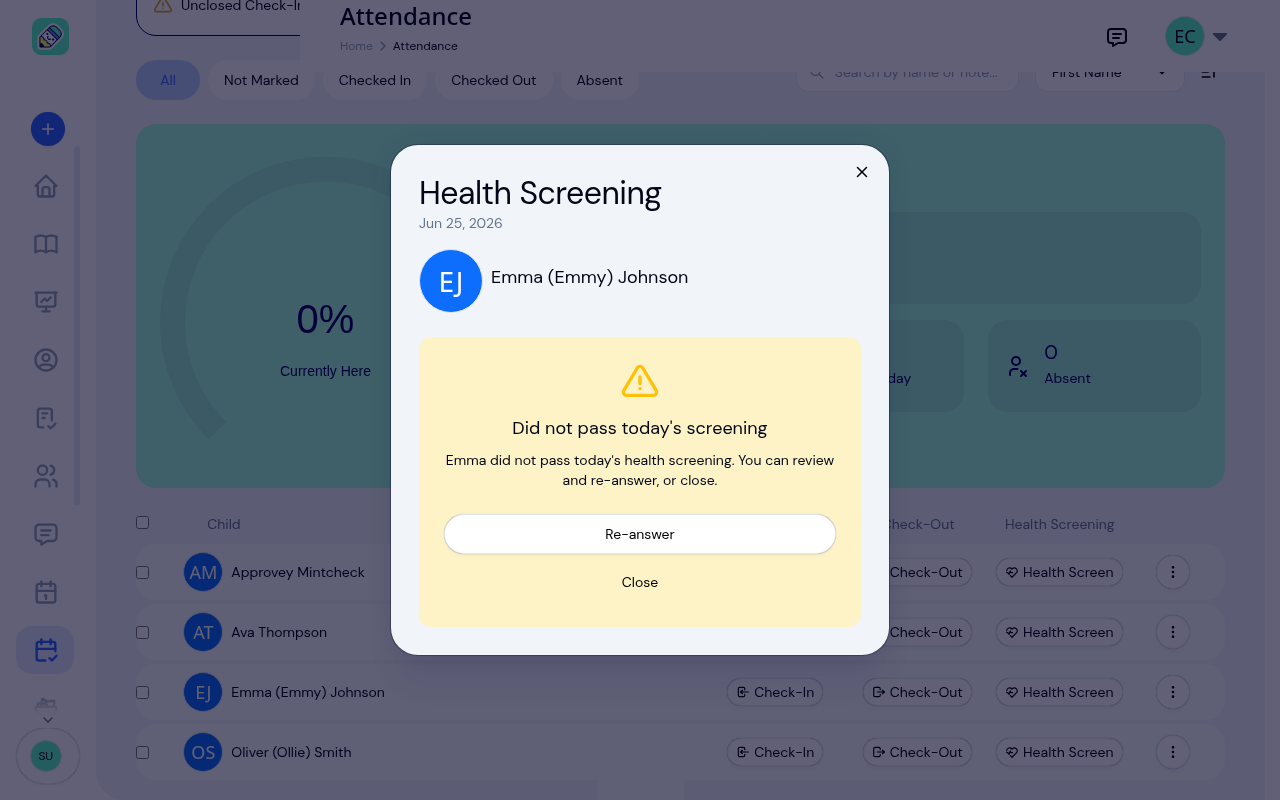
A child who did not pass cannot be checked in. If it was a mistake, click the child's Needs Review button and Re-answer the questions to correct it for the day.
Reviewing a completed screening
A screening isn't locked once it's done. You can reopen it from the attendance list at any point during the day:
- Click a Screened button to see the answers again. They open read-only, so you can review what was recorded and then Close without changing anything.
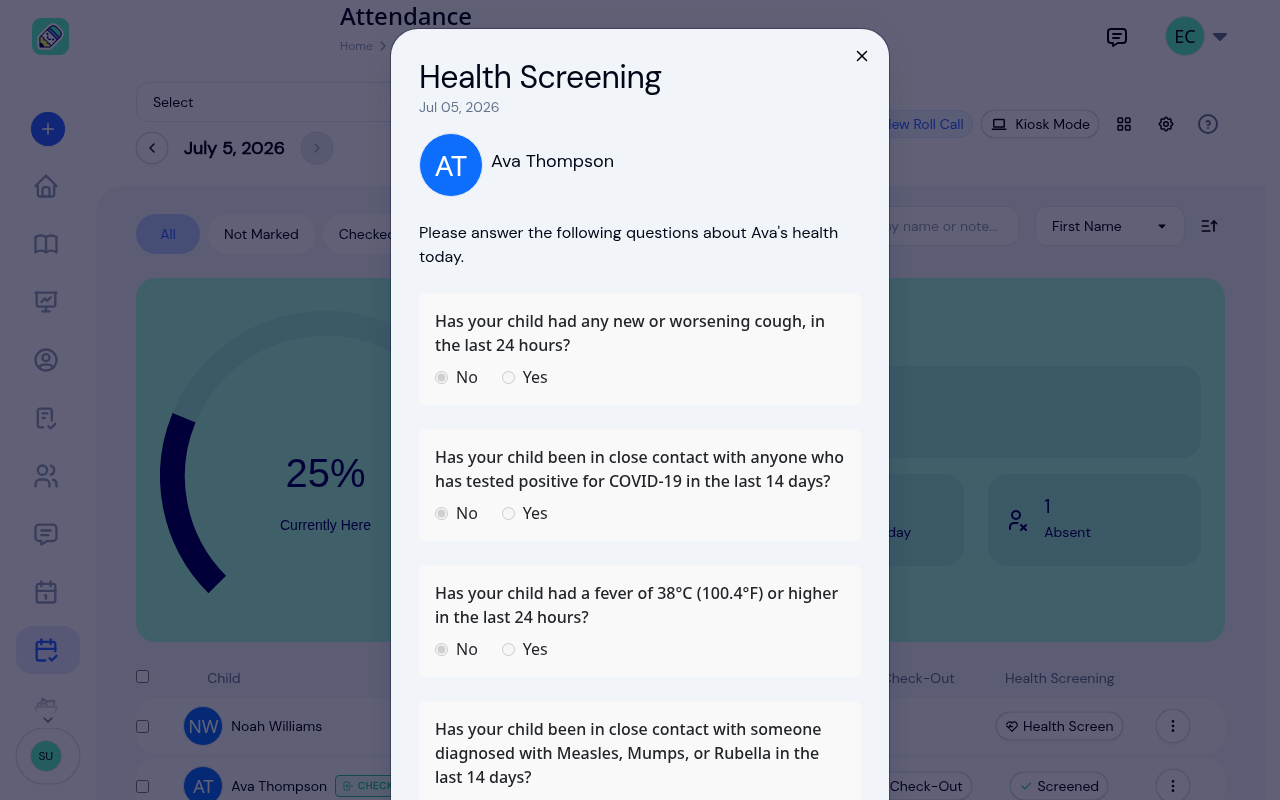
- Click a Needs Review button to open the questions ready to answer again, in case the first result was a mistake or the child's situation has changed.
Bulk Actions
Select multiple children using the checkboxes on the left side of each row. A bulk actions bar appears at the top with these options:
- Check In — check in everyone selected at once
- Check Out — check out everyone selected at once
- Mark Absent — mark everyone selected as absent
- Edit — change the time or notes on a record for everyone selected
- Delete — remove a record for everyone selected

Check In, Check Out, and Mark Absent each open a modal where you set a time and notes that apply to everyone selected.
Bulk Edit and Bulk Delete
Bulk Edit and Bulk Delete act on one kind of record at a time. After you open either, first choose whether you're working with the Check-In, Check-Out, or Absent record.
- Bulk Edit lets you set a note and, if you want, a time. Only the fields you fill in are changed, so you can leave the time blank to update notes without touching each child's individual arrival time. For example, select a group of children who are present, choose Check-In, and tag them all "Art Room" in one step.
- Bulk Delete removes the chosen record for the selected children after a confirmation.
If some of the children you selected don't have that kind of record yet (for example, a child who hasn't checked in), KidzLog skips them and tells you how many were skipped.
Editing an Attendance Record
To edit a check-in, check-out, or absence after the fact:
Open the actions menu
Click the three-dot menu (⋮) on the right side of the child's row.
Select Edit
Choose Edit from the dropdown.
Make your changes
In the edit modal, you can:
- Switch between Check-In, Check-Out, and Absent
- Change the recorded time
- Update notes
- When editing historical records, you'll need to provide a reason for the change
Save
Click Submit to save your changes.
As when checking out, a check-out time may be set to the same minute as the check-in. Only a check-out earlier than the check-in is rejected.
To edit several children at once, use Bulk Edit from the bulk actions bar (see Bulk Actions above).
Deleting an Attendance Record
To remove a record entirely, click the three-dot menu (⋮) and select Delete. You'll be asked to confirm before the record is permanently removed. To remove records for several children at once, use Bulk Delete from the bulk actions bar.
Notes
Notes help you track context about a child's attendance. You can add notes during check-in, check-out, or when marking absent.
Predefined notes are quick-select pills like:
- Art Room, Outdoor Play, Gym
- Leaving Early, Late Arrival
- Bus Pickup, Doctor's Appointment
You can also type a custom note (up to 224 characters). To view all notes for a child's attendance record, click the notes icon on their row.